推荐一个工具网站:Java代码生成平台
添加依赖:
<dependency>
    <groupId>cn.hutool</groupId>
    <artifactId>hutool-all</artifactId>
    <version>5.8.1</version>
</dependency>
Hutool官网
树结构工具-TreeUtil
官方示例:
构建tree:
// 构建node列表
List<TreeNode<String>> nodeList = CollUtil.newArrayList();

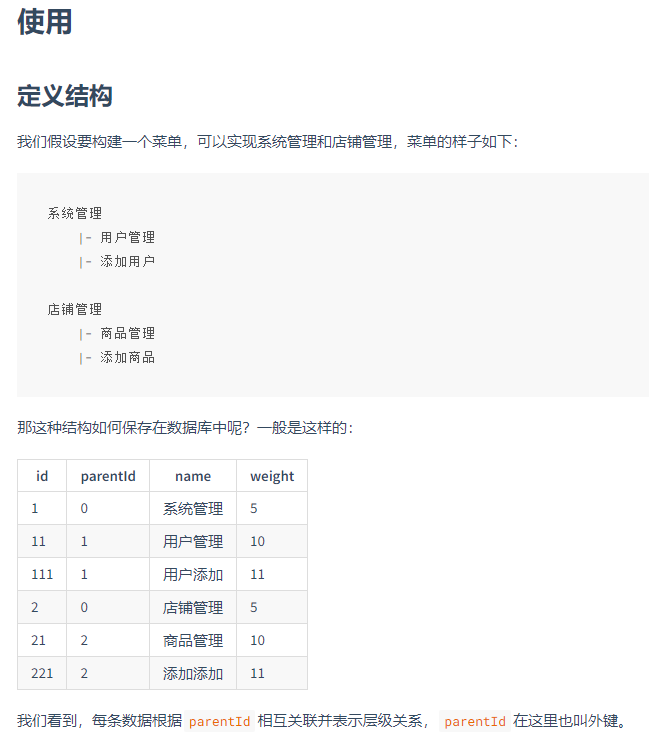
nodeList.add(new TreeNode<>("1", "0", "系统管理", 5));
nodeList.add(new TreeNode<>("11", "1", "用户管理", 222222));
nodeList.add(new TreeNode<>("111", "11", "用户添加", 0));
nodeList.add(new TreeNode<>("2", "0", "店铺管理", 1));
nodeList.add(new TreeNode<>("21", "2", "商品管理", 44));
nodeList.add(new TreeNode<>("221", "2", "商品管理2", 2));
TreeNode表示一个抽象的节点,也表示数据库中一行数据。 如果有其它数据,可以调用setExtra添加扩展字段。
// 0表示最顶层的id是0
List<Tree<String>> treeList = TreeUtil.build(nodeList, "0");
因为两个Tree是平级的,再没有上层节点,因此为List。
自定义字段名:
//配置
TreeNodeConfig treeNodeConfig = new TreeNodeConfig();
// 自定义属性名 都要默认值的
treeNodeConfig.setWeightKey("order");
treeNodeConfig.setIdKey("rid");
// 最大递归深度
treeNodeConfig.setDeep(3);

//转换器
List<Tree<String>> treeNodes = TreeUtil.build(nodeList, "0", treeNodeConfig,
        (treeNode, tree) -> {
            tree.setId(treeNode.getId());
            tree.setParentId(treeNode.getParentId());
            tree.setWeight(treeNode.getWeight());
            tree.setName(treeNode.getName());
            // 扩展属性 ...
            tree.putExtra("extraField", 666);
            tree.putExtra("other", new Object());
        });
通过TreeNodeConfig我们可以自定义节点的名称、关系节点id名称,这样就可以和不同的数据库做对应。
使用实例:
@Data
@NoArgsConstructor
@AllArgsConstructor
public class AClothClassVo {
    private Integer id;
    private String name;
    private Integer pid;
    private Integer status;
    private String desc;
    // 子目录列表
    private List<AClothClassVo> treeNode;

    public static void main(String[] args) {
        // 构建数据
        List<AClothClassVo> lists = CollUtil.newArrayList();
        lists.add(new AClothClassVo(1, "顶级目录1", 0, 1, "父目录01", null));
        lists.add(new AClothClassVo(2, "顶级目录2", 0, 1, "父目录02", null));
        lists.add(new AClothClassVo(3, "顶级目录3", 0, 1, "父目录03", null));
        lists.add(new AClothClassVo(4, "二级目录4", 1, 1, "父目录01的子类", null));
        lists.add(new AClothClassVo(5, "三级目录5", 4, 1, null, null));
        lists.add(new AClothClassVo(6, "四级目录6", 5, 1, null, null));
        lists.add(new AClothClassVo(7, "二级目录7", 2, 1, "父目录01的子类7", null));
        lists.add(new AClothClassVo(8, "二级目录8", 2, 1, "父目录01的子类8", null));
        lists.add(new AClothClassVo(9, "三级目录9", 4, 1, null, null));

        TreeNodeConfig config = new TreeNodeConfig();

        // 树形数据中id的属性名,写成id1方便区分,实际上写AClothClassVo实体类的id属性名
        config.setIdKey("id1");

        // 展示目录深度,数据中一共四级目录
        config.setDeep(2);

        /**
         * 入参
         * tree:  最终要返回的数据
         * node:  lists数据
         *
         * 返回
         * Tree<String>
         *   Tree: 转换的实体 为数据源里的对象类型
         *   String: ID类型
         *
         */

        List<Tree<String>> list = TreeUtil.build(lists, "0", config, (node, tree) -> {
            tree.setId(node.getId().toString());
            tree.setName(node.getName());
            tree.setParentId(node.getPid().toString());

            // 额外的值
            tree.put("status", node.getStatus());
            tree.put("desc", node.getDesc());
        });

        System.out.println(JSON.toJSONString(list));
    }
}
返回数据:
[
    {
        "id1":"1",
        "name":"顶级目录1",
        "parentId":"0",
        "status":1,
        "desc":"父目录01",
        "children":[
            {
                "id1":"4",
                "name":"二级目录4",
                "parentId":"1",
                "status":1,
                "desc":"父目录01的子类"
            }
        ]
    },
    {
        "id1":"2",
        "name":"顶级目录2",
        "parentId":"0",
        "status":1,
        "desc":"父目录02",
        "children":[
            {
                "id1":"7",
                "name":"二级目录7",
                "parentId":"2",
                "status":1,
                "desc":"父目录01的子类7"
            },
            {
                "id1":"8",
                "name":"二级目录8",
                "parentId":"2",
                "status":1,
                "desc":"父目录01的子类8"
            }
        ]
    },
    {
        "id1":"3",
        "name":"顶级目录3",
        "parentId":"0",
        "status":1,
        "desc":"父目录03"
    }
]


